How to Make a Thermos Bottle: Engineering, Materials & Real-World Performance
Introduction: Why “Good” Thermos Bottles Are Actually Precision Thermal Systems
If you’ve ever compared two insulated bottles side by side, you’ve probably noticed something counterintuitive: they may look identical, use similar materials, and claim the same capacity—yet one keeps water hot for 12–24 hours, while the other drops to lukewarm in just a few hours.
From an engineering and manufacturing standpoint, this gap is not accidental. A high-performance thermos is the result of controlled heat transfer, precise forming, and reliable vacuum integrity—not just a “double wall.”
In practice, we evaluate thermos performance along three axes:
- Material system (food safety, corrosion resistance, thermal behavior)
- Vacuum quality & sealing integrity (the dominant factor)
- Design details (lid, opening geometry, coatings, and user interaction)
This article explains what actually matters—covering DIY limits, optimal materials, factory processes, and how long a thermos really keeps liquids hot in real-world use.
Can You Make a Thermos Bottle at Home?
1.1 What DIY Can Achieve (and What It Can’t)
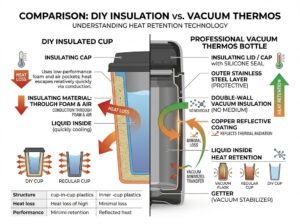
A common DIY approach is a cup-in-cup design:
- Place one container inside another
- Fill the gap with foam, cloth, or paper
- Seal with a lid
This reduces conductive heat loss modestly. However, it does not address convection (air movement) or radiation (infrared heat loss), which remain significant pathways.
By contrast, a true thermos relies on the vacuum insulation—removing air between two walls to suppress both conduction and convection. Without specialized equipment, you cannot:
- Pull a stable vacuum to industrial levels
- Seal that vacuums hermetically
- Maintain integrity through thermal cycling and handling
1.2 The Practical Verdict
DIY builds can produce insulated containers, but not vacuum flasks. In controlled testing, even small leaks in the inter-wall space lead to rapid performance degradation—often halving heat retention within hours.
What Is the Best Material for a Thermos Bottle?
Choosing the right material for a thermos bottle is not just a matter of cost or appearance. In a real production environment, the material has to satisfy several requirements at the same time: it must be safe for food contact, strong enough for deep drawing and vacuum construction, resistant to corrosion from daily beverages, and stable enough to maintain sealing performance over repeated hot-and-cold cycles. This is exactly why stainless steel has become the dominant material in modern insulated bottles. In both U.S. and EU regulatory frameworks, food-contact materials are expected to be safe and inert enough that they do not transfer substances into food in amounts that could endanger health or alter taste, odor, or composition.
2.1 Why Stainless Steel Is the Industry Standard
From a manufacturing perspective, stainless steel is the best overall material because it solves multiple engineering problems at once. First, stainless steels rely on a chromium-rich passive oxide film on the surface, and that passive layer is what gives them their corrosion resistance. World Stainless notes that chromium is the essential element in stainless steel, and that corrosion resistance is tied to this passive surface layer.
Second, austenitic stainless steels such as AISI 304 Dan AISI 316 have good formability and ductility, which is critical for thermos manufacturing. A thermos bottle is not made from a thick block of metal; it is made from relatively thin stainless steel that must be deep-drawn into an inner liner and an outer shell without cracking, wrinkling, or losing dimensional stability. World Stainless identifies 304 as the classic “18% chromium, 8% nickel” grade and describes austenitic grades as having good formability and ductility.
Third, stainless steel works exceptionally well with the actual structure of a thermos bottle. A high-performance bottle requires a double-wall body, welded seams, and a stable vacuum cavity. That means the material must tolerate forming, trimming, welding, polishing, and sealing without becoming brittle or unstable. In practice, this compatibility with vacuum-flask manufacturing matters more than simplistic consumer-level claims such as “metal keeps heat better.” The bottle body is only one part of the system; the real performance comes from how well the material supports vacuum integrity over time.
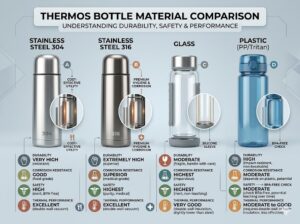
2.2 304 vs 316: The Difference Most Articles Oversimplify
Most consumer articles describe 304 as “good” and 316 as “better,” but that is too vague to be useful.
baja tahan karat 304 is the baseline grade for most thermos bottles because it offers an excellent balance of food-contact suitability, corrosion resistance, manufacturability, and cost. It is widely used because it can be formed efficiently, welded reliably, and polished to a hygienic finish. For general daily beverages such as water, tea, coffee, and most milk-based drinks, 304 is more than sufficient in most household and commercial applications.
316 stainless steel, by contrast, contains molybdenum, and that is the key technical difference. According to World Stainless grade data, the molybdenum in 316 improves overall corrosion resistance, especially against pitting and crevice corrosion in chloride environments. That matters in applications where the bottle may be exposed to more aggressive conditions, such as salty liquids, electrolyte drinks, marine climates, or repeated contact with acidic residues and inadequate cleaning.
So in real product development, the decision is not “316 is always superior.” The better question is: superior for what use case? If the bottle is intended for standard daily hydration, commuter use, office use, or gifting, 304 is usually the most commercially rational choice. If the bottle is positioned as premium, outdoor-oriented, medical-adjacent, or aimed at users who value maximum corrosion resistance, 316 may justify the additional cost. In other words, 316 is not automatically necessary, but it is technically advantageous in more demanding chemical environments.
2.3 Why Glass and Plastic Do Not Dominate Thermos Construction
Glass and plastic are often mentioned as alternatives, but they are rarely the best core material for a modern vacuum thermos bottle.
Glass has one major advantage: it is chemically inert and does not easily retain taste. That is why some users prefer glass liners for flavor purity. However, from an engineering standpoint, glass is fragile, impact-sensitive, and less practical for portable products. A thermos bottle is expected to survive commuting, backpack use, desk drops, and frequent handling. Glass simply cannot match stainless steel in impact resistance and structural reliability under everyday mechanical stress.
Plastik is attractive because it is lightweight and inexpensive, but it has several limitations. It is not suitable as the primary vacuum body in the same way stainless steel is, especially for long-term hot-liquid use. It can deform more easily under heat, scratch more easily during cleaning, and does not provide the same combination of structural rigidity, welding compatibility, and long-term barrier stability that metal does. In practice, plastics are far more common in lids, caps, outer accessories, and handle systems than in the main vacuum chamber itself.
2.4 The Hidden Performance Features in Better Thermos Bottles
Once a manufacturer has chosen stainless steel, the next level of performance comes from refinements that many buyers never see.
One of the most important is a reflective layer, often copper-based, applied in the vacuum area. In a vacuum flask, conduction and convection are already greatly reduced because air has been removed. At that point, radiative heat transfer becomes more important, and reflective metallic layers help send thermal radiation back toward the liquid instead of letting it escape outward. This is why high-end thermos bottles often perform noticeably better even when they use the same visible stainless steel grade as lower-end products.
Another overlooked factor is surface finish. A well-polished interior is not only about appearance. It improves cleanability, reduces the tendency for residue buildup, and supports hygiene over repeated use. For beverages such as coffee, tea, juice, or milk-based drinks, this matters in real life because a rougher interior can trap more deposits and become harder to maintain.
Wall thickness also needs to be engineered carefully. Many people assume thicker steel automatically means better insulation, but that is not always true. Excessive thickness adds weight and thermal mass, while poor thickness control can affect forming consistency and welding precision. In production, the goal is not “the thickest steel possible,” but a thickness profile that gives the bottle enough mechanical strength while preserving process stability and user comfort.
2.5 Expert Conclusion: The Best Material Is the One That Matches the Whole System
If we evaluate the question professionally rather than cosmetically, the best material for a thermos bottle is usually food-grade austenitic stainless steel, with 304 as the standard choice Dan 316 as the higher-corrosion-resistance upgrade for more demanding environments. This conclusion is not based on marketing language; it comes from how stainless steel behaves in forming, welding, sealing, corrosion control, hygiene, and long-term daily use. Food-contact rules in both the U.S. and EU further reinforce that thermos materials must be selected for safety and inertness, not just cost.
So if you want the simplest expert answer, it is this: 304 stainless steel is the best all-around thermos material for most products; 316 is the better choice when stronger corrosion resistance is required; and the final performance still depends heavily on vacuum quality, weld integrity, lid design, and manufacturing discipline.
How Thermos Bottles Are Made (Factory-Level Process)
Most online guides stop at “double wall + vacuum.” In reality, performance depends on how each step is executed.
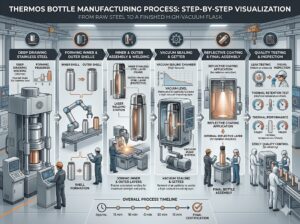
3.1 Forming: Creating the Inner and Outer Shells
- Deep drawing or hydroforming shapes stainless steel blanks into:
- Inner liner (in contact with liquid)
- Outer shell (structural casing)
Key variables:
- Wall thickness uniformity
- Residual stress (affects long-term stability)
- Surface finish (affects cleanliness and coating adhesion)
3.2 Joining: Precision Welding
The two shells are assembled and joined using:
- Laser welding (high precision, minimal heat-affected zone)
- TIG welding (robust, widely used)
Mengapa hal ini penting: Any micro-defect at the joint becomes a potential leak path for vacuum loss. In production audits, welding quality correlates strongly with field failure rates.
3.3 Vacuum Creation and Sealing
- Industrial pumps evacuate the inter-wall space to a low-pressure (near-vacuum) state
- The evacuation port is then pinched-off or sealed (often via localized welding)
According to vacuum flask principles (see [insert authoritative reference, e.g., academic/engineering source]), eliminating air reduces:
- Conduction (no medium)
- Convection (no fluid motion)
Critical reality: A high vacuum at the moment of sealing is not enough—retention over time is what differentiates premium products. This depends on:
- Weld integrity
- Material permeability
- Seal design
3.4 Surface Treatment and Functional Coatings
- Electropolishing / mechanical polishing for hygiene and corrosion resistance
- Powder coating / spray coating for durability and grip
- Reflective coating (Cu/Ag) inside the vacuum gap to reduce radiative losses
3.5 Quality Testing and Standards
Typical factory QA includes:
- Leak testing (helium or pressure-based methods)
- Thermal retention tests (standardized fill temperature, time intervals)
- Drop and impact testing
Quality systems often align with ISO 9001 (quality management) and product-specific safety/food-contact guidelines
How Long Will Water Stay Hot in a Thermos?
4.1 Expected Performance Ranges
- Entry-level: 4–8 hours
- Mid-range: 8–12 hours
- High-end: 12–24 jam
Manufacturers typically define “hot” as maintaining above a target threshold (e.g., 60°C after X hours—exact definitions vary; [insert standard/test method reference]).
4.2 The Real Determinants (Ranked)
- Vacuum Quality & Integrity The dominant factor. Poor vacuum = rapid decay curve.
- Tutup & Seal System In practice, the lid is the primary heat loss pathway due to:
- Thinner materials
- Moving parts and interfaces
- Frequent user interaction
- Opening Geometry
- Narrow mouth: lower convective exchange → better retention
- Wide mouth: convenience for filling/cleaning → higher losses
- Usage Patterns
- Frequent opening accelerates heat loss
- Preheating the bottle (with hot water) reduces initial thermal shock
4.3 Practical Insight from Field Use
Two identical bottles can perform very differently depending on:
- Fill temperature and volume
- Ambient conditions (wind, cold surfaces)
- User behavior (opening frequency)
This is why lab claims Dan real-world experience sometimes diverge.
Choosing a Thermos for Real Life (Not Just Spec Sheets)
5.1 What Users Actually Need
Beyond theory, users prioritize:
- Consistent retention across a workday
- Food safety and taste neutrality
- Leak-proof reliability
- Portabilitas (weight, size, ergonomics)
5.2 Modern Design Direction
Contemporary stainless steel bottles aim to balance:
- Thermal performance
- Daya tahan
- Kegunaan sehari-hari
For instance, products like the Stainless Steel Water Bottle reflect this balance—combining double-wall vacuum insulation with food-grade materials and portable form factors suited for commuting, gym use, and travel.
5.3 What to Check Before You Choose
- Material grade (304 vs 316 where relevant)
- Lid construction (multi-seal vs simple cap)
- Mouth size vs intended use
- Stated test conditions for “X-hour” claims
Conclusion: Performance Comes from Engineering Discipline
A thermos bottle is not defined by its appearance, but by its control of heat transfer:
- DIY insulation can slow heat loss—but cannot match vacuum performance
- Stainless steel remains the optimal material for durability and safety
- Vacuum integrity and sealing precision are the true differentiators
- Lid design and usage patterns often decide real-world outcomes
In short, a reliable thermos is a precision-engineered system. Understanding these fundamentals allows you to select products that deliver consistently—not just in specifications, but in daily use.