How to Make a Thermos Bottle: Materials, Manufacturing & Performance Explained
A thermos bottle looks simple from the outside, but its performance depends on careful engineering, material selection, and precise manufacturing. Many people assume a thermos is just a metal bottle with a lid. In reality, a high-quality thermal flask is a temperature-control product built to reduce heat transfer as much as possible.
That is why some bottles can keep coffee hot for hours or water cold all day, while others lose temperature much faster. The difference usually comes down to three things: the materials used, how the bottle is manufactured, and whether the vacuum insulation system is properly sealed.
In this guide, we explain how thermos bottles are manufactured, what materials are used in making thermal flasks and why, and whether it is realistic to build your own thermos at home.
What Is a Thermos Bottle and How Does It Work?
A thermos bottle, also called a thermal flask or vacuum flask, is designed to slow down temperature change. It does this by reducing the three main ways heat moves:
- conduction
- convection
- radiation
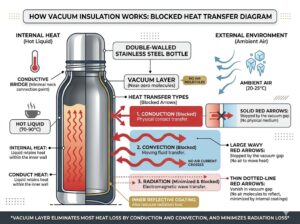
The most important feature in a modern thermos is the double-wall vacuum structure. The bottle has an inner wall and an outer wall, with a near-vacuum space between them. Since there is very little air in that gap, heat cannot move easily from the inside to the outside or the other way around.
This is why a thermos can work for both hot and cold drinks. It does not create heat or cold by itself. It simply slows the transfer of heat, which helps preserve the original temperature of the liquid inside.
What Materials Are Used to Make a Thermos?
The materials used in a thermos are not chosen only for appearance. Each material has a functional role in safety, insulation, durability, and manufacturability.
1. Stainless Steel
Stainless steel is the most common material used in modern thermos bottles. It is used for both the inner liner and the outer shell in most premium products.
The most common grades are:
Why stainless steel is used
- strong and impact-resistant
- suitable for food and beverage contact
- resistant to rust and corrosion
- compatible with vacuum insulation manufacturing
- does not break easily during transport or daily use
304 stainless steel is usually the standard choice for everyday thermos bottles because it offers a good balance of durability, corrosion resistance, and cost.
316 stainless steel is often used in more premium bottles because it has better resistance to corrosion, especially in demanding environments.
2. Glass
Glass was widely used in older thermos designs and is still used in some traditional vacuum flasks.
Why glass is used
- chemically inert
- preserves beverage taste very well
- does not retain odors easily
Limitations of glass
- fragile and easier to break
- less suitable for travel or outdoor use
- harder to use in rugged consumer products
Glass performs well in flavor preservation, but it is less practical for modern portable bottles.
3. Plastic
Plastic is usually not the main vacuum body in high-performance thermos bottles, but it is commonly used for:
- lids
- cup covers
- handles
- outer decorative parts
- sealing components
Why plastic is used
- lightweight
- easy to mold into complex shapes
- cost-effective
- useful for external parts that do not directly handle extreme thermal stress
Food-grade plastics such as BPA-free polypropylene are often used for safety and convenience.
4. Silicone
Silicone is mainly used in seals and gaskets.
Why silicone is used
- flexible and durable
- helps create a leak-resistant seal
- withstands temperature changes well
- supports long-term lid performance
Without good silicone sealing parts, even a well-made thermos body can lose real-world performance through the lid area.
5. Copper or Reflective Coating
Some higher-end thermos bottles include a copper-coated or reflective layer inside the vacuum structure.
Why reflective layers are used
- reduce radiative heat transfer
- improve heat retention
- increase overall insulation efficiency
This is an advanced performance feature often found in premium vacuum flasks.
What Materials Are Used in Making Thermal Flasks and Why?
If we answer this question in the most practical way, the ideal thermal flask uses a combination of materials, not just one.
Inner liner
Usually stainless steel or sometimes glass
Reason: direct contact with beverages requires food safety, durability, and taste neutrality
Outer shell
Usually stainless steel
Reason: it protects the vacuum structure and provides impact resistance
Lid components
Usually food-grade plastic and silicone
Reason: lightweight construction, easy opening, secure sealing, and leak prevention
Optional performance layer
Copper or reflective coating
Reason: improved thermal efficiency through reduced heat radiation
So when people ask what materials are used in making thermal flasks and why, the answer is that each part is selected for a different job. Stainless steel supports strength and vacuum performance, glass supports flavor neutrality, plastic supports usability, and silicone supports sealing.
How Are Thermos Manufactured?
This is where thermos production becomes much more technical than most consumers realize.
A thermos bottle is not made by simply shaping metal and screwing on a lid. The manufacturing process requires controlled forming, precision welding, vacuum sealing, and quality inspection.
Step 1: Raw Material Preparation
The process usually starts with stainless steel sheets or coils.
The raw metal is selected according to:
- thickness
- grade
- formability
- food-contact suitability
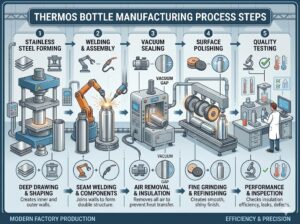
The material is then cut into pieces suitable for forming the inner and outer bottle walls.
Step 2: Forming the Inner and Outer Walls
The bottle body is formed into two separate parts:
- the inner liner
- the outer shell
This is usually done through deep drawing or similar metal-forming processes.
At this stage, dimensional precision matters a lot. If the walls are not properly formed, later vacuum sealing and assembly can be compromised.
Step 3: Trimming and Neck Formation
After forming, the edges are trimmed and the bottle neck is shaped.
This ensures:
- uniform dimensions
- correct lid fit
- stable structure for later welding and sealing
Step 4: Joining the Structure
The inner and outer parts are assembled together.
A small gap is left between the two walls so a vacuum can later be created.
This stage often uses precision welding. The quality of this step is critical, because poor joints may lead to leakage or insulation failure later.
Step 5: Vacuum Creation
This is the most important stage in thermos manufacturing.
Air is removed from the gap between the inner and outer walls using vacuum equipment. Once the desired vacuum level is reached, the bottle is sealed.
This vacuum layer is what gives the thermos its performance.
Without it, the bottle would only be a double-wall metal container, not a true vacuum flask.
Step 6: Insulation Enhancement
In higher-end bottles, manufacturers may add reflective coatings inside the vacuum layer to reduce heat radiation.
This improves long-term heat retention, especially in premium stainless steel bottles.
Step 7: Surface Finishing
The outside of the bottle may go through:
- polishing
- painting
- matte finishing
- printing or branding
This stage improves both appearance and grip.
Step 8: Lid and Accessory Assembly
The lid, gasket, handle, and other functional parts are assembled.
This stage matters because a thermos can lose real performance through the lid if the seal is poor.
Step 9: Quality Testing
A professionally manufactured thermos bottle is usually tested for:
- vacuum integrity
- leak resistance
- heat retention
- cold retention
- lid sealing performance
- exterior defects
This is an important part of making sure the bottle performs consistently in real use.
How to Build Your Own Thermos
This is one of the most searched questions, but it needs an honest answer.
Can you build your own thermos at home?
You can build a basic insulated container, but you cannot easily build a true high-performance vacuum thermos at home.
What you can do at home
A homemade version usually involves:
- one container placed inside another
- insulating materials like foam, cloth, or paper between the walls
- a tightly closed lid
This may help reduce heat loss to some degree.
Why it is not the same as a real thermos
A real thermos depends on:
- industrial vacuum extraction
- precise metal forming
- reliable sealing
- sometimes reflective inner coatings
These are difficult to replicate with household tools.
Simple DIY concept
A basic DIY insulated bottle can be made by:
- choosing a smaller bottle or cup
- placing it inside a larger container
- filling the gap with insulating material
- sealing the top as tightly as possible
This may help keep drinks warm or cool for a short time, but it will not perform like a commercial vacuum flask.
Practical conclusion
If your goal is to understand insulation, a DIY bottle can be a useful experiment.
If your goal is to achieve true long-term thermal performance, industrial manufacturing is necessary.
Why Manufacturing Quality Matters More Than Most People Think
Two thermos bottles may look similar from the outside but perform very differently.
That difference often comes from:
- vacuum quality
- weld precision
- lid sealing performance
- material consistency
- quality control standards
A bottle made from decent materials can still perform poorly if the vacuum sealing is weak. On the other hand, a well-manufactured bottle with strong process control will usually deliver better and more stable insulation over time.
This is why manufacturing discipline matters just as much as raw material choice.
Common Misunderstandings About Thermos Bottles
“Thicker metal means better insulation”
Not always. Insulation is mainly determined by vacuum quality, not simply wall thickness.
“All stainless steel bottles are thermos bottles”vacuum insulation
No. A stainless steel bottle can be single-wall and completely non-insulated.
“A thermos only works for hot drinks”
Wrong. A vacuum flask slows temperature change in both directions, so it helps keep drinks cold as well.
“A DIY insulated bottle is the same as a real thermos”
No. A homemade bottle may reduce heat transfer somewhat, but it does not match the performance of a true vacuum-sealed product.
How to Choose a Well-Made Thermos Bottle
If you are evaluating thermos bottles as a buyer, manufacturer, or brand, look for these factors:
- food-grade stainless steel construction
- double-wall vacuum insulation
- reliable sealing lid
- durable surface finish
- stable weld and structure
- good heat and cold retention claims
- manufacturer consistency and quality control
For premium positioning, you may also consider:
- 316 stainless steel
- copper lining
- custom exterior finishing
- branded packaging and private label support
Abschluss
A thermos bottle is much more than a simple drink container. It is a carefully engineered product built around material science, vacuum insulation, and manufacturing precision.
To summarize:
- Thermos bottles are usually made from stainless steel, with plastic and silicone used for lids and seals
- Some thermal flasks also use glass or reflective coatings depending on the design
- Thermos manufacturing involves forming, welding, vacuum sealing, finishing, and testing
- You can build a simple insulated bottle at home, but not a true vacuum thermos with professional-level performance
- The most important factors in thermos performance are material quality, vacuum integrity, and production control
Understanding how a thermos bottle is made makes it much easier to evaluate product quality, choose the right materials, and explain performance differences in a way that is both technically accurate and commercially useful.