How to Tie Ribbon on a Gift Box Diagonally
A Step-by-Step Guide for Elegant, Professional Gift Wrapping
Diagonal ribbon wrapping is one of the simplest ways to make a gift box look more refined and intentional. Unlike traditional cross or straight ribbon styles, a diagonal ribbon adds movement and visual interest, making it especially popular for large gift boxes, rectangular boxes, and premium gifts.
In this guide, you’ll learn:
- How to wrap diagonally with ribbon
- How to tie ribbon on a big gift box
- How to wrap a rectangular box diagonally
- The most common ribbon tying mistakes—and how to avoid them
This method works for holidays, birthdays, weddings, corporate gifts, and any occasion where presentation matters.
Key Takeaways – Diagonal Ribbon Wrapping Made Easy
- Diagonal ribbon wrapping adds elegance and movement
- It works especially well on big and rectangular gift boxes
- Proper ribbon width and tension are essential
- Most mistakes come from loose ribbon or poor placement
- Simple bows often look better than oversized ones
Why Diagonal Ribbon Wrapping Looks More Elegant
Diagonal ribbon wrapping stands out because it:
- Breaks away from rigid symmetry
- Creates a modern, flowing look
- Draws the eye naturally across the box
- Works well on oversized or elongated gift boxes
This style is often used in boutique packaging because it feels effortless but intentional, even when the materials are simple.
What Is Diagonal Ribbon Wrapping?
Diagonal ribbon wrapping means placing the ribbon across the gift box at an angle rather than straight across the center. The ribbon typically runs from one corner or edge to the opposite side, with the bow or knot positioned off-center.
Compared to classic wrapping styles:
- Straight ribbon feels traditional and formal
- The cross ribbon is symmetrical and structured
- Diagonal ribbon feels relaxed, modern, and stylish
What You Need Before You Start
Before tying the ribbon diagonally, make sure your gift box is already wrapped in paper.
Materials
- Ribbon (satin, grosgrain, velvet, or cotton)
- Scissors
- Double-sided tape or clear tape (optional)
- A flat, wrapped gift box
Ribbon Width Guide
- Small boxes: 1–2 cm wide ribbon
- Medium boxes: 2–4 cm wide ribbon
- Large boxes: 4–6 cm wide ribbon
Using the right ribbon width prevents the ribbon from looking too thin or overpowering.
How to Wrap Diagonally With Ribbon (Detailed Step-by-Step Method)
Diagonal ribbon wrapping may look effortless, but the final result depends heavily on careful placement, even tension, and clean finishing. Follow the steps below to achieve a polished, professional look that works for most gift box sizes.
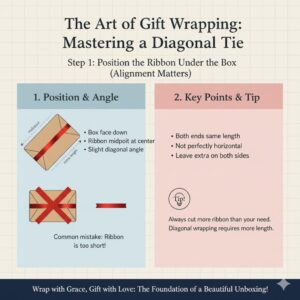
Step 1: Position the Ribbon Under the Box (Alignment Matters)
Place the wrapped gift box face down on a flat surface. Slide the ribbon underneath the box so that the midpoint of the ribbon sits roughly under the center of the box.
Key points to check:
- Both ribbon ends should be approximately the same length
- The ribbon should not be perfectly horizontal—angle it slightly to prepare for the diagonal wrap
- Leave extra ribbon on both sides to allow for adjustments later
The goal of this step is to create a natural diagonal line across the front without forcing a steep or awkward angle.
Common mistake: Starting with ribbon that is too short or pulled too tight, which limits flexibility later.
Tip: Always cut more ribbon than you think you need. Diagonal wrapping requires more length than straight or cross wrapping.
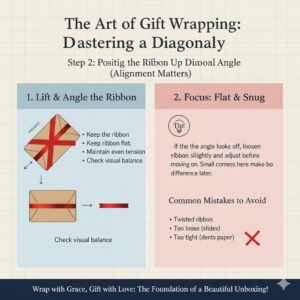
Step 2: Bring the Ribbon Up Diagonally (Control Angle and Tension)
Lift both ends of the ribbon and bring them across the front of the box:
- One end should travel toward the upper right area
- The other should travel toward the lower left area
Focus on three things during this step:
- Keep the ribbon flat Smooth it with your fingers to avoid twists or creases.
- Maintain even tension The ribbon should sit snugly against the box but not so tight that it dents the wrapping paper.
- Check visual balance Step back briefly to see whether the diagonal line looks centered and proportional.Tip: If the angle looks off, loosen the ribbon slightly and adjust before moving on. Small corrections here make a big difference later.
Step 3: Flip the Box and Secure the Back (Hidden Stability Point)
While holding the ribbon in place, carefully flip the box over.
On the back side:
- Let the ribbon ends cross naturally
- Gently pull to maintain the same tension as the front
- If needed, secure the crossing point with a small piece of clear or double-sided tape
This hidden anchor prevents the ribbon from sliding or shifting over time.
Important:
- Keep tape away from edges so it does not show from the sides
- Do not overtighten—the ribbon should remain smooth on the frontTip: For large boxes or slippery ribbon materials (such as satin), securing the back is highly recommended.
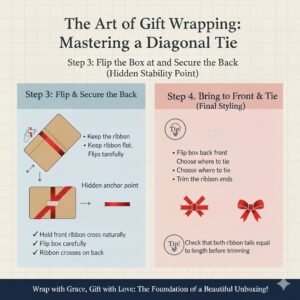 Step 4: Bring the Ribbon to the Front and Tie (Final Styling)
Flip the box back to the front. The ribbon should now form a clean diagonal line across the surface.
Choose where to tie the knot or bow:
- Slightly off-center looks more natural than dead center
- Avoid placing the bow too close to the edge or corner
Bow and Knot Options
- Clean, minimal appearance
- Ideal for corporate or modern gifts
Classic Bow
- More decorative and festive
- Works well for holidays, birthdays, and celebrations
After tying, trim the ribbon ends:
- Cut at a diagonal for a sharp, modern look
- Or cut a small “V” shape for a classic gift-wrapping finishTip: Before trimming, check that both ribbon tails are equal in length. Uneven tails can make the entire wrap look careless.
Final Check for a Professional Finish
Before presenting the gift:
- Look at the box from all sides
- Make sure the ribbon lies flat with no twists
- Confirm the diagonal line feels balanced
- Adjust the bow slightly if needed
A few seconds of final adjustment can elevate the entire presentation.
How to Wrap a Rectangular Box Diagonally
Rectangular boxes require a bit more attention because uneven proportions can make the ribbon look awkward.
Key Tips for Rectangular Boxes
- Place the diagonal ribbon closer to the longer side
- Avoid steep angles that exaggerate length
- Keep the ribbon tension even across the entire surface
Ribbon Length Tip
Rectangular boxes usually need extra ribbon, especially if the box is long and shallow. Always test-wrap once before tying the final bow.
How to Tie Ribbon on a Big Gift Box
Large gift boxes benefit greatly from diagonal ribbon wrapping, but they also require stronger visual balance.
Best Practices for Big Boxes
- Use a wider ribbon for better proportion
- Avoid very thin or flimsy ribbons
- Add light tape support on the back if the ribbon slips
Preventing Ribbon Sagging
- Pull ribbon snug but not tight
- Use a non-slip ribbon material
- Position the bow slightly higher rather than dead center
For oversized boxes, diagonal wrapping often looks cleaner than cross wrapping.
Bow Styles That Work Best With Diagonal Wrapping
Not all bows suit diagonal ribbons equally.
Best Options
- Classic bow: Balanced and decorative
- Flat bow: Modern and understated
- Simple knot: Minimal and elegant
When to Avoid Big Bows
- On very sleek or modern gifts
- When the ribbon itself is wide or textured
- When you want a luxury, minimal aesthetic
Common Ribbon Tying Mistakes (And How to Avoid Them)
Ribbon Too Loose
Loose ribbon slides out of place. Keep consistent tension while wrapping.
Twisted Ribbon
Always smooth the ribbon before tying. Twists break the clean look.
Bow Placed Too Close to the Edge
This makes the box look unbalanced. Keep the bow slightly inward.
Wrong Ribbon Width
Thin ribbon on large boxes looks weak. Match ribbon width to box size.
Uneven Angles
Step back and check symmetry before tying the final knot.
Pro Tips for a Clean, Professional Look
- Check alignment from multiple angles
- Hide tape and knots on the back
- Keep color combinations simple
- Trim ribbon ends evenly
- Less decoration often looks more premiumTip: If something looks off, loosen and adjust before cutting—small changes make a big difference.
FAQ – Diagonal Ribbon Wrapping
How do you wrap diagonally with ribbon? Place the ribbon under the box, pull it across the front at an angle, secure the back, and tie the bow on the front.
How do you tie ribbon on a big gift box? Use a wider ribbon, keep tension even, and secure the back if needed to prevent slipping.
How do you wrap a rectangular box diagonally? Adjust the ribbon angle to match the box’s proportions and use extra ribbon length.
What are the most common ribbon tying mistakes? Loose ribbon, twisted ribbon, wrong ribbon width, and off-center bow placement.