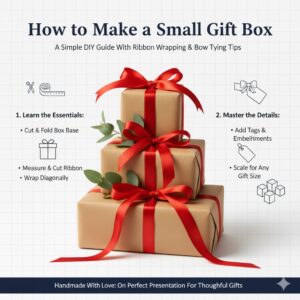
How to Make a Small Gift Box
A Simple DIY Guide With Ribbon Wrapping & Bow Tying Tips
Small gift boxes are perfect for handmade presents, party favors, jewelry, cosmetics, and thoughtful personal gifts. They are easy to customize, cost very little to make, and look especially elegant when paired with the right ribbon technique.
In this guide, you’ll learn:
- How to make a small gift box from scratch
- How to wrap diagonally with ribbon
- How to wrap a rectangular box diagonally
- How to tie ribbon bows for gifts
- How the same ribbon techniques apply to big gift boxes
This tutorial is beginner-friendly and does not require professional tools.
Key Takeaways – Making and Wrapping a Small Gift Box
- Small gift boxes are easy to make and customize
- Diagonal ribbon wrapping adds elegance instantly
- The same ribbon techniques work for all box sizes
- Proper ribbon width and tension matter more than decoration
- Simple bows often look the most refined
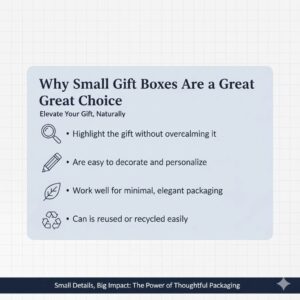
Why Small Gift Boxes Are a Great Choice
Small gift boxes are popular because they:
- Highlight the gift without overwhelming it
- Are easy to decorate and personalize
- Work well for minimal, elegant packaging
- Can be reused or recycled easily
Whether you’re wrapping a handmade item or preparing gifts for an event, a small box paired with clean ribbon wrapping instantly elevates presentation.
What You Need to Make a Small Gift Box
Before you begin, gather these basic materials:
- Cardstock or thin cardboard
- Ruler
- Pencil
- Scissors or craft knife
- Glue or double-sided tape
- Decorative paper (optional)
For a sturdier box, thicker cardstock works best.
How to Make a Small Gift Box (Basic DIY Method — Detailed)
This method creates a clean, sturdy gift box using cardstock or thin cardboard. It’s beginner-friendly and works well for jewelry, candy, small cosmetics, and mini gifts.
Recommended Finished Size (Example)
- Base (inside): 8 × 8 cm
- Height: 4 cm
You can scale up or down easily after you understand the template.
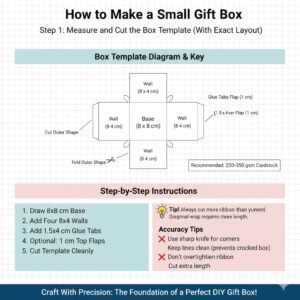
Step 1: Measure and Cut the Box Template (With Exact Layout)
You’ll create a “plus-sign” style template: a center square (the base) with four side panels (the walls), plus glue tabs.
A) Choose Your Cardstock
- Best option: 250–350 gsm cardstock (sturdy but foldable)
- If using thin cardboard: it will be stronger, but harder to fold cleanly (scoring becomes essential)
B) Draw the Base
On your cardstock, draw an 8 × 8 cm square in the center. This is the bottom of your box.
C) Add the Four Walls
From each side of the base square, draw a rectangle outward:
- Each wall rectangle should be 8 cm wide (same as base side)
- And 4 cm tall (the box height)
So you will have:
- Top wall: 8 × 4 cm
- Bottom wall: 8 × 4 cm
- Left wall: 8 × 4 cm
- Right wall: 8 × 4 cm
D) Add Glue Tabs (Important for Strength)
On two opposite wall panels, add glue tabs along the vertical edges.
Recommended tab size:
- 1.5 cm wide (wide enough to hold firmly)
- Same height as the wall (4 cm)
You can add tabs on:
- Left + right wall panels or
- Top + bottom wall panelsTipp: Keep the tabs straight and consistent. Uneven tabs cause crooked edges.
E) Optional: Add Top Edge “Turn-Over” Flaps (Makes the Box Look Premium)
If you want a more professional finish, add a 1 cm flap along the top edge of each wall panel. These flaps fold inward and reinforce the rim.
This is optional but makes the box:
- more rigid
- more premium
- less likely to bend when opened
F) Cut the Template Cleanly
Use scissors or a craft knife (better for sharp corners).
Cut the outer shape carefully.
Accuracy tips:
Step 2: Score, Fold, and Assemble the Box (For Crisp Edges)
This is where most DIY boxes succeed or fail. Scoring creates clean folds and prevents cracking.
A) Score All Fold Lines
Use a ruler and a blunt tool (or the back of a butter knife) to score every fold line:
- Between the base and each wall panel
- Along glue tabs
- Along top edge flaps (if you added them)Tipp: Score lightly but firmly—don’t cut through the cardstock.
B) Pre-Fold Before Gluing
Fold each wall up along the scored line.
Fold glue tabs inward.
If you added rim flaps, fold them inward as well (but don’t glue them yet unless you want extra structure).
This “dry fold” helps you check:
- Are the walls even?
- Does the box stand flat?
- Do the tabs line up correctly?
C) Glue the Tabs
Apply glue (or double-sided tape) to the glue tabs.
Then:
- Lift the walls upright
- Press each tab firmly against the inside of the next wall
- Hold for 10–20 seconds (longer if using liquid glue)
For a stronger bond:
- Use double-sided tape for instant hold
- Or glue + clamp/paper clips for 1–2 minutes
D) Check the Base Is Flat
Set the box on the table and press gently on the base.
If it rocks or wobbles, one wall is misaligned.
Fix immediately before glue fully dries.
Tipp: If your box looks slightly uneven, gently reshape the corners while the glue is still flexible.
https://www.youtube.com/watch?v=lX2eSEOZFVs
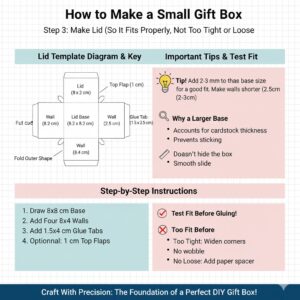
Step 3: Make the Lid (So It Fits Properly, Not Too Tight or Loose)
A lid is basically a second box with slightly larger dimensions and slightly shorter walls.
A) Increase the Lid Base Size
For an 8 × 8 cm box, make the lid base:
- 8.2 × 8.2 cm (tight fit) or
- 8.3 × 8.3 cm (easier fit)
A good rule:
- Add 2–3 mm to each side
This extra space accounts for:
- cardstock thickness
- folded wall layers
B) Make Lid Walls Shorter
Recommended lid wall height:
- 2.5–3 cm (instead of 4 cm)
This makes the lid look neat and prevents it from swallowing the whole box.
C) Use the Same Assembly Method
Repeat:
- draw template
- cut
- score
- fold
- glue
D) Test Fit (Before Glue Fully Sets)
Before everything dries, test the lid on the box:
- It should slide on smoothly
- It should not wobble excessively
- It should not require force
If too tight:
- slightly widen the lid corners while glue is still soft If too loose:
- add a thin paper strip inside one lid wall as a spacer
Quick Size Formula (So You Can Customize Any Box)
If your desired base size is B Und height is H:
- Center square = B × B
- Wall panels = B × H (four sides)
- Glue tabs = 1–1.5 cm wide
- Lid base = (B + 2–3 mm) × (B + 2–3 mm)
- Lid height = H × 0.6–0.8 (usually looks best)
How to Decorate a Small Gift Box
Decoration can be minimal or festive depending on the occasion.
Popular options include:
- Wrapping paper or patterned cardstock
- Stickers or labels
- Stamps or handwritten notes
- Plain paper with ribbon only (for a modern look)
Often, less decoration looks more premium, especially when paired with a well-tied ribbon.
How to Wrap a Small Gift Box With Ribbon
Small gift boxes look best with:
- Narrow ribbon (1–2 cm wide)
- Soft materials like satin, cotton, or grosgrain
You can wrap straight across or diagonally. Diagonal wrapping adds movement and elegance, even to simple boxes.
How to Wrap Diagonally With Ribbon
Diagonal ribbon wrapping works beautifully on small boxes and instantly adds a boutique feel.
Basic Diagonal Wrapping Steps
- Place the ribbon under the box at a slight angle
- Bring both ends across the front diagonally
- Flip the box and cross the ribbon on the back
- Bring the ribbon back to the front and tie
Adjust the angle until the diagonal line looks balanced.
How to Wrap a Rectangular Box Diagonally
Rectangular boxes need extra attention to proportions.
Tips for rectangular boxes:
- Position the ribbon closer to the longer side
- Avoid steep angles that exaggerate length
- Use slightly more ribbon than for square boxes
Step back and check the visual balance before tying the bow.
How to Tie Ribbon on a Big Gift Box (Quick Tips)
Although this guide focuses on small boxes, the same techniques apply to big gift boxes.
For large boxes:
- Use wider ribbon for balance
- Keep tension even to prevent sagging
- Secure the back with tape if needed
The method remains the same—the scale changes, not the process.
How to Tie Ribbon Bows for Gifts
The bow style should match the size of the box.
Popular Bow Options
Classic Bow
- Timeless and decorative
- Ideal for birthdays and holidays
Flat Bow
- Modern and minimal
- Great for small or elegant boxes
Simple Knot
- Clean and understated
- Best for professional or minimalist gifts
Trim ribbon ends evenly for a polished finish.
Common Wrapping and Ribbon Mistakes
Avoid these common issues:
- Ribbon too wide for a small box
- Bow overpowering the gift
- Twisted ribbon
- Uneven diagonal placement
- Over-decorating the box
Clean lines always look better than excess decoration.
Pro Tips for a Professional Finish
- Always check alignment before cutting ribbon
- Smooth ribbon with your fingers to remove twists
- Keep bow slightly off-center for a natural look
- Match ribbon color to box tone
A few small adjustments can dramatically improve the final result.
FAQ – Small Gift Boxes & Ribbon Wrapping
How do you make a small gift box at home? Use cardstock, cut a simple template, fold along scored lines, and glue the sides together.
How do you wrap diagonally with ribbon? Place ribbon under the box at an angle, cross it diagonally on the front, secure the back, and tie.
How do you tie ribbon bows for gifts? Choose a classic bow, flat bow, or simple knot depending on box size and style.
Can the same ribbon method be used on big gift boxes? Yes. Only the ribbon width and length need to be adjusted.