Do It Yourself Gift Box
Creative, Budget-Friendly Ways to Make Your Own Gift Boxes at Home
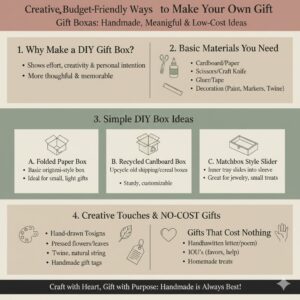
O do it yourself gift box is one of the most meaningful ways to give a present. Unlike store-bought packaging, a DIY gift box shows effort, creativity, and personal intention. Whether you are working with a small budget—or no budget at all—a handmade gift box can feel more thoughtful and memorable than something expensive.
In this guide, you’ll learn:
- How to make your own gift boxes at home
- How to make a simple DIY box using basic materials
- What a Tinggly gift box is and how it inspires DIY gifting
- What great gifts can cost nothing—and still feel special
This article focuses on practical steps, creative ideas that work for holidays, birthdays, anniversaries, and everyday gifting.
Key Takeaways – DIY Gift Boxes Done Right
- DIY gift boxes emphasize thoughtfulness over cost
- Simple materials can look intentional when used carefully
- Experience-based gifts add emotional value
- Gifts that cost nothing can still feel meaningful
- Clean design and personal touches matter most
Why DIY Gift Boxes Are So Popular
DIY gift boxes have grown in popularity for several reasons:
- They feel personal and handmade
- They are flexible for any budget
- They reduce waste and reuse materials
- They allow you to tailor the gift to the recipient
More importantly, DIY gift boxes shift attention away from price and toward thoughtfulness. A carefully assembled box—even with simple contents—often feels more meaningful than a generic store-bought gift.
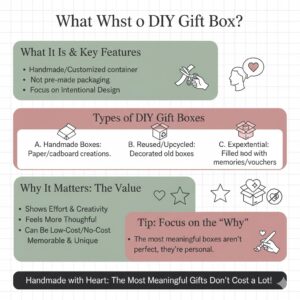
What Is a DIY Gift Box?
A DIY gift box is any gift container that you create or customize yourself rather than purchasing pre-made packaging. This can include:
- Handmade boxes of paper or cardboard
- Reused boxes decorated creatively
- Containers filled with personal or experiential gifts
DIY gift boxes can be:
- Minimal and simple
- Decorative and artistic
- Memory-based or experience-based
The key feature is intentional design, not cost.
How to Make Your Own Gift Boxes
(Overview)
Every DIY gift box has three basic elements:
- Structure – the box or container itself
- Presentation – decoration, wrapping, and layout
- Contents – what you place inside
You can keep all three simple and still create something meaningful.
How to Make a Simple DIY Box (Step-by-Step)
Materials You Can Easily Find at Home
You don’t need special tools. Most DIY boxes can be made using:
- Cardboard or thick paper
- Old shoe boxes, cereal boxes, or delivery boxes
- Scissors or a craft knife
- Glue or tape
- Scrap paper, wrapping paper, or newspaper
Optional decorations:
- Ribbon or string
- Markers or pens
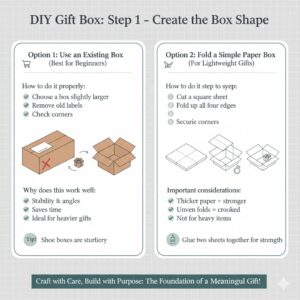
Step 1: Create the Box Shape (Detailed Guide)
Creating the box shape is the foundation of the entire DIY gift box. If the shape is unstable or poorly sized, no amount of decoration will fix it. The goal of this step is to create a clean, well-proportioned container that fits the gift comfortably.
Option 1: Use an Existing Box (Best for Beginners)
This is the easiest and most reliable method, especially if you want a neat result without complex measuring.
How to do it properly:
- Choose a box that is slightly larger than your gift.
- Cel/Cea/Cei/Cele gift should fit with a little space on each side (about 1–2 cm).
- Avoid oversized boxes, as they require excessive filler and look empty.
- Remove all old labels, stickers, and tape from the outside.
- Clean the surface if necessary (wipe dust or residue).
- Check the corners and edges for weakness.
Why does this work well:
- Existing boxes already have correct angles and stability.
- They save time and reduce cutting errors.
- They are ideal for heavier gifts or multiple items.Sfat: Shoe boxes and small delivery boxes are usually sturdier than cereal boxes and work better for gift boxes that will be handled or transported.
Option 2: Fold a Simple Paper Box (For Lightweight Gifts)
This option is great for small, light gifts such as notes, jewelry, or experience vouchers.
How to do it step by step:
- Cut a square sheet of thick paper or light cardboard.
- The size of the square determines the box size.
- Place the square flat and fold up all four edges evenly to form walls.
- Create clean creases using your fingers or the back of a ruler.
- Secure each corner from the inside using glue or tape.
- Let it dry completely before moving on.
Important considerations:
- Thicker paper creates stronger walls.
- Uneven folds result in a crooked box.
- This type of box is not suitable for heavy items.Sfat: If the paper feels too thin, glue two sheets together before folding to increase strength.
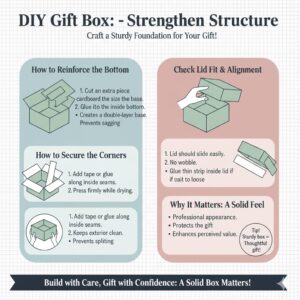
Step 2: Strengthen the Structure (Make It Feel Solid)
Once the basic shape is done, the next step is to make sure the box feels sturdy in the hands. A box that bends, collapses, or feels flimsy can make even a thoughtful gift feel unfinished.
How to Reinforce the Bottom
The bottom of the box carries the most weight.
Best methods:
- Cut an extra piece of cardboard the same size as the box base.
- Place it inside the box and glue it down.
- Press firmly and let it dry.
This creates a double-layer base that significantly improves stability.
How to Secure Corners
Corners are the weakest points in DIY boxes.
What to do:
- Add tape or glue along the inside corner seams.
- Press the corners together firmly while drying.
- Avoid adding tape on the outside unless it’s decorative.
Why inside reinforcement matters:
- Keeps the exterior clean and professional.
- Prevents the box from splitting when filled.
Check Lid Fit and Alignment
If your box has a lid:
- The lid should slide on easily without force.
- It should not wobble or fall off when lifted gently.
- Trim edges if the fit is too tight.Sfat: If the lid is loose, glue a thin strip of paper along the inside edge of the lid to tighten the fit.
Step 3: Decorate the Box (Simple but Intentional)
Decoration is not about adding more—it’s about adding just enough to make the box feel personal and finished.
Start With a Clean Base
Before decorating:
- Make sure the box is dry and firm.
- Smooth any rough edges.
- Decide on a simple color direction.
A clean base makes even minimal decoration look intentional.
Wrapping the Box
If the box surface looks plain or mismatched:
- Wrap it with plain paper, kraft paper, or recycled paper.
- Cut paper precisely to size.
- Keep seams on the bottom or back.
- Use minimal tape and hide it carefully.
Why wrapping helps:
- Unifies different materials.
- Covers printing or logos.
- Creates a “store-bought” appearance.
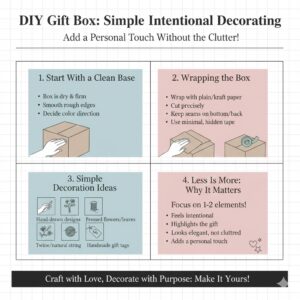
Adding Personal Decoration
Choose one main decorative element, not many.
Good options include:
- A handwritten message or name
- A simple ribbon or string
- A small drawing or symbol
- A gift tag made from scrap paper
What to avoid:
- Too many stickers
- Mixed colors and patterns
- Heavy decorations that make the box hard to open
Color and Style Tips
- Stick to one or two colors.
- Neutral tones feel calm and timeless.
- Bright colors work best for children or festive occasions.
Classic low-cost look: Brown paper + white string + handwritten tag.
Final Decoration Check
Before moving on:
- Does the box open easily?
- Is everything secure?
- Does it look intentional rather than improvised?
If the answer is yes, the decoration is complete.
Quick Summary of the Three Steps
DIY Gift Box Ideas Using Recycled or Free Materials
You can create beautiful DIY gift boxes without buying anything new.
Shoe Box Gift Box
- Sturdy and spacious
- Easy to decorate
- Ideal for clothing or multiple items
Cereal Box Gift Box
- Cut and reshape into smaller boxes
- Lightweight and flexible
- Great for flat gifts or notes
Mason Jar or Glass Container
- Perfect for small gifts or notes
- Reusable and decorative
- Requires minimal decoration
Envelope-Style Gift Box
- Made from folded paper
- Ideal for letters or experience gifts
- Completely free if using scrap paper
What Is a Tingly Gift Box?
O Tinggly gift box is not about physical items—it’s about experiences. Instead of giving an object, the gift represents an activity or memory, such as:
- Travel experiences
- Classes or workshops
- Adventures or special moments
The physical box is symbolic. The real value is in what the recipient gets to do, not what they receive.
This idea strongly influences modern DIY gift boxes.
DIY Experience Gift Boxes (Inspired by Tinggly)
You can create your own experience-based gift box at home.
How It Works
Instead of physical items, they include:
- Handwritten vouchers
- Printed notes or photos
- Promises or plans
DIY Experience Gift Ideas
- “Dinner of your choice” voucher
- “One full day together” note
- “Movie night” coupon
- “Weekend trip planning” card
Place these inside a simple handmade box to create anticipation.
Sfat: The more specific the experience, the more meaningful the gift feels.
What Is a Great Gift That Costs Nothing?
Some of the most valued gifts cost nothing at all. These gifts focus on time, effort, and emotion.
Examples include:
- A handwritten letter
- A promise of help or support
- Shared time or attention
- Personal skills (cooking, teaching, organizing)
When packaged thoughtfully, these gifts feel intentional rather than cheap.
DIY Gift Box Ideas That Cost Nothing
Memory Box
Fill the box with:
- Notes of shared memories
- Printed photos (or hand-drawn versions)
- Small symbolic items
Letter Box
- Write several letters for different moments
- Label them by theme or date
Coupon Box
Create coupons for:
- Favors
- Quality time
- Acts of kindness
“Reasons I Appreciate You” Box
Write short notes expressing appreciation. Simple, emotional, and powerful.
| DIY Gift Box Type | What to Put Inside | Cel mai bun pentru | Why It Works |
| Memory Box | Notes of shared memories, printed photos or hand-drawn images, small symbolic items | Partners, close friends, family members | Evokes nostalgia and emotional connection through shared experiences |
| Letter Box | Several handwritten letters labeled by theme or date | Long-distance relationships, anniversaries, emotional gifts | Creates anticipation and allows the recipient to revisit your thoughts over time |
| Coupon Box | Handwritten coupons for favors, quality time, or acts of kindness | Couples, parents, everyday gifting | Offers ongoing value and turns the gift into future experiences |
| “Reasons I Appreciate You” Box | Short notes expressing gratitude, compliments, or appreciation | Anyone who values emotional connection | Simple, personal, and emotionally powerful without material cost |
Common DIY Gift Box Mistakes to Avoid
- Making the box too weak
- Over-decorating
- Using mismatched colors
- Choosing a box too large or too small
- Ignoring the recipient’s style
DIY does not mean careless. Clean execution matters.
Tips for Making DIY Gift Boxes Look Thoughtful, Not Cheap
- Keep designs simple
- Focus on neat edges and clean lines
- Use consistent colors
- Add at least one personal elementSfat: If you wouldn’t proudly give it to a friend, refine it one more time.
FAQ – DIY Gift Boxes
How do you make your own gift boxes? By creating or repurposing a box using cardboard or paper, reinforcing it, decorating simply, and adding meaningful content.
How do you make a simple DIY box? Use an existing box or folded cardboard, secure the structure, and decorate with paper or handwritten elements.
What is a Tinggly gift box? It’s a gift centered around experiences rather than physical items, inspiring experience-based DIY gift boxes.
What is a great gift that costs nothing? Time, attention, handwritten letters, shared experiences, and emotional support can be meaningful zero-cost gifts.