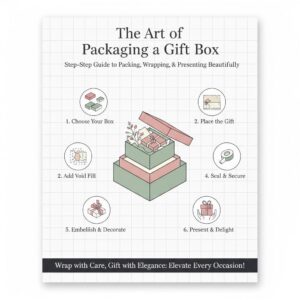
How to Package a Gift Box
A Step-by-Step Guide to Packing, Wrapping, and Presenting Gifts Beautifully
Packaging a gift box is more than just placing items inside a container. A well-packaged gift box communicates care, intention, and thoughtfulness before the gift is even opened. Whether you’re preparing a birthday present, a holiday goodie box, or a corporate gift, how you package the gift box directly affects how the gift is perceived.
This guide explains:
- How to package a gift box properly
- How to pack a gift box nicely so it looks professional
- How to pack a goodie box with multiple items
- Whether you should wrap a gift box
- What the 3 gift rule for Christmas is and how to apply it
Everything is written in a practical, easy-to-follow way, suitable for beginners and experienced gift-givers alike.
Key Takeaways – Packaging a Gift Box the Right Way
- Choose the correct box size before anything else
- Build the gift from the base up
- Keep layouts clean and intentional
- Use filler to support, not overwhelm
- Wrapping is optional if the box is decorative
- Thoughtful packaging enhances emotional value
Why Gift Box Συσκευασία Matters
Before the recipient touches the gift itself, they interact with the packaging. A well-designed gift box:
- Builds anticipation
- Protects the contents
- Makes the gift feel intentional rather than rushed
- Enhances emotional value without increasing cost
In many cases, simple but well-executed packaging feels more meaningful than expensive wrapping done poorly.
What You Need Before Packaging a Gift Box
Before you start, gather your materials. Having everything ready makes the process smoother and more precise.
Essential Packaging Materials
- A sturdy gift box in the correct size
- Tissue paper (neutral or themed colors)
- Shredded paper or filler
- Double-sided tape
- Ribbon or twine
- Gift tag or small cardΑκρο: Always choose a box that is slightly larger than the gift, but never oversized. Too much empty space makes the gift feel less substantial.
How to Pack a Gift Box Nicely (Step-by-Step — Detailed)
Packing a gift box nicely comes down to structure, balance, and cleanliness. When done right, the box opens smoothly, items don’t shift, and the presentation feels intentional rather than rushed. Below is a more detailed, practical breakdown you can follow every time.
Step 1: Prepare the Base Layer (Foundation & Protection)
The base layer is the foundation of the entire gift box. It serves two purposes: protecting the contents και creating visual height.
How to do it properly
- Choose a soft filler such as shredded paper, folded tissue paper, or crinkle cut paper.
- Spread the filler evenly across the bottom—no bare corners.
- Press lightly with your hand so the layer is springy, not compressed.
Why this matters
- A soft base absorbs shock during transport.
- It prevents the main gift from touching the hard bottom of the box.
- It visually “lifts” the gift, making it look fuller and more premium.
Common mistakes to avoid
- Using too little filler, causing items to sink and look lost.
- Packing filler too tightly, making the box hard to close.Ακρο: Neutral base colors (white, beige, light gray) work for almost any gift. For themed gifts, match the base color to one accent color in the gift itself.
Step 2: Place the Main Gift Item First (Visual Anchor)
The main gift sets the tone. Everything else in the box should support it visually.
Best placement techniques
- Single item: Place it centered, aligned with the box edges.
- Multiple items: Position the main item slightly toward the back or center, leaving room in front for smaller pieces.
- Make sure the item sits flat and doesn’t wobble.
For fragile items
- Wrap lightly in tissue paper or soft wrap.
- Secure with a small piece of tape underneath (never visible on top).
- Test stability by gently shaking the box before continuing.
Why this matters
- The recipient’s eyes go to the main item first.
- A stable centerpiece prevents the rest of the layout from collapsing.Ακρο: If the main item is tall, tilt it back slightly using filler behind it—this improves visibility when the box is opened.
Step 3: Add Supporting Items Thoughtfully (Balance & Flow)
Supporting items should feel organized and intentional, not random.
How to arrange supporting items
- Group similar items together (e.g., skincare together, snacks together).
- Arrange by height: taller items in back, smaller items in front.
- Keep a consistent spacing between items—uneven gaps look messy.
Layout styles that work well
- Symmetrical layout: Best for formal or corporate gifts.
- Layered layout: Best for lifestyle or casual gift boxes.
- Diagonal flow: Adds a modern, dynamic feel for creative gifts.
What to avoid
- Stacking items directly on top of each other.
- Placing small items where they disappear visually.Ακρο: If an item is visually weak (small or plain), place it near a stronger item so it benefits from the visual focus.
Step 4: Fill Empty Spaces Carefully (Security Without Clutter)
Empty space is necessary—but only when it’s controlled.
How to fill gaps correctly
- Add filler along the sides and corners first.
- Gently tuck filler between items using your fingers.
- Stop when items feel secure but remain visible.
Why this step matters
- Prevents shifting during movement.
- Keeps the layout intact when the box is opened.
- Makes the box feel full and complete.
Signs you’ve used too much filler
- Items are hidden instead of framed.
- The box lid won’t close easily.
- The presentation feels chaotic.Ακρο: Use filler in the same color family as the base layer to keep the look cohesive.
Step 5: Create a Clean Top Layer (Final Polish)
The top layer is the last thing the recipient sees before opening the gift—and the first thing they touch.
How to do it well
- Use one or two sheets of tissue paper.
- Fold, don’t crumple, for a clean finish.
- Let the edges peek out slightly above the box rim.
- Keep folds symmetrical and centered.
Why it works
- Softens the presentation.
- Hides internal structure without hiding the gift.
- Creates a “reveal” moment when lifted.
Optional finishing touches
- Add a small card on top of the tissue.
- Tuck a ribbon tail or dried flower into the fold.Ακρο: Avoid too many layers on top. One clean layer looks more professional than several messy ones.
Final Check Before Closing the Box
Before closing:
- Gently tilt the box—nothing should slide.
- Check that no tape or rough edges are visible.
- Ensure the lid closes smoothly without pressure.
If it passes these checks, your gift box is packed cleanly, securely, and beautifully.
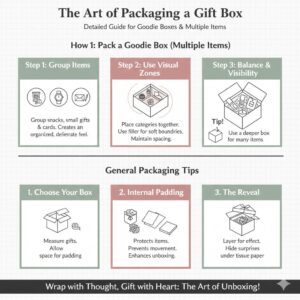
How to Pack a Goodie Box (Multiple Small Items)
A goodie box usually contains several small items such as snacks, samples, or themed gifts. The challenge is preventing it from looking messy.
Step 1: Group Items by Category
Παραδείγματα:
- Snacks together
- Small gifts together
- Notes or cards together
Grouping helps the box feel organized and deliberate.
Step 2: Use Sections or Visual Zones
You don’t need dividers, but visual separation helps.
- Place one category on each side
- Use filler to create soft boundaries
- Keep spacing consistent
Step 3: Balance Quantity and Visibility
Avoid piling items too deeply.
- Every item should be partially visible
- Overlapping is fine, stacking is notΑκρο: If you have many items, use a slightly deeper box rather than forcing everything into a shallow one.
Are You Supposed to Wrap a Gift Box?
This depends on the style of the box and the occasion.
When You Should Wrap a Gift Box
- Plain cardboard or kraft boxes
- When giving a surprise gift
Wrapping adds mystery and elevates simple packaging.
When You Can Skip Wrapping
- Decorative rigid boxes
- Magnetic closure gift boxes
- Premium boxes designed for presentation
In these cases, adding a ribbon or tag is often enough.
Rule of thumb: If the box already looks like a gift, wrapping is optional.
Gift Box Wrapping Tips That Look Professional
If you choose to wrap the box, small details matter.
- Use paper cut precisely to size
- Keep seams on the bottom
- Choose ribbon width proportional to the box size
- Place bows off-center for a modern lookΑκρο: One ribbon + one tag usually looks better than multiple decorations.
What Is the 3 Gift Rule for Christmas?
The 3 gift rule is a minimalist approach to Christmas gifting. It typically includes:
- Something they want
- Something they need
- Something to wear or read
How to Apply the 3 Gift Rule Using a Gift Box
- Choose one box large enough for all three items
- Place the “want” item as the centerpiece
- Arrange the other two items symmetrically
- Use filler to visually connect the items
This method works well for children and adults and helps prevent over-gifting while keeping presentation meaningful.
Common Gift Box Packaging Mistakes to Avoid
Even thoughtful gifts can feel underwhelming if packaged poorly.
Avoid these mistakes:
- Using a box that is too large
- Overstuffing with filler
- Mixing too many colors or textures
- Forgetting to secure fragile items
- Leaving tape or rough folds visible
Clean lines and restraint almost always look better.
Tips to Make Any Gift Box Look Thoughtful
You don’t need expensive materials to make a gift feel special.
- Use consistent color tones
- Keep the design simple
- Match the style to the recipientΑκρο: When in doubt, choose fewer items and package them well. Quality presentation beats quantity every time.
FAQ – Gift Box Packaging
How do you pack a gift box nicely? By layering the base, centering the main gift, filling empty space carefully, and finishing with a clean top layer.
How do you pack a goodie box? Group items by category, arrange them visibly, and avoid stacking too many items on top of each other.
Are you supposed to wrap a gift box? Not always. Decorative or premium boxes often don’t need wrapping—just a ribbon or tag.
What is the 3 gift rule for Christmas? It’s a gifting guideline that focuses on three items: something wanted, needed, and worn or read.